Email Authentication SPF DKIM DMARC: The Complete Setup for Cold Email Senders in 2026
coldoutreachagency.com
Contents
Email Authentication SPF DKIM DMARC: The Complete Setup for Cold Email Senders in 2026
Imagine this. you’ve spent months building your cold outreach list. Your copy converts. Your offer hits pain points. You hit send on 1,000 emails. And then… silence. Not replies. Just silence. Your emails are rotting in spam folders because nobody told you about email authentication.
here’s what nobody in the cold email game talks about until it’s too late: Gmail, Outlook, and Yahoo now block emails that don’t pass authentication checks. we’re talking about SPF, DKIM, and DMARC. Without these three protocols locked in, you’re sending your messages into the digital equivalent of a void.
This isn’t a technical lecture. This is a playbook. If you send cold email, you need authentication configured correctly or watch your sender reputation crumble while your competitors dominate the inbox.
Bottom Line
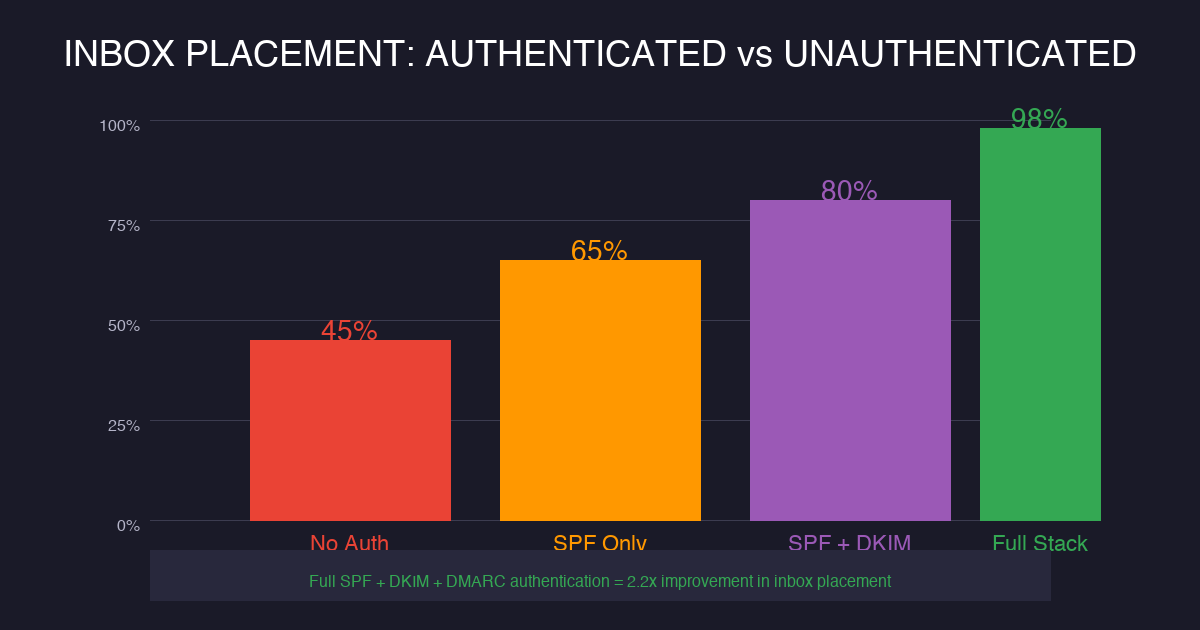
Cold email senders who skip SPF, DKIM, and DMARC setup lose 15-30% of their emails to spam filters before they even get opened. We built The Email Shield Protocol to help senders lock in all three authentication layers in under two hours. The result? Better inbox placement, protected sender reputation, and emails that actually reach your prospects. Setup costs zero dollars. Ignoring it costs you every lead that never saw your message.
Why Do Email Providers Care About Authentication in 2026?
Email providers are fighting a war against spam. In 2024, Gmail and Yahoo announced stricter requirements for senders: anyone blasting more than 5,000 emails daily must have SPF, DKIM, and DMARC configured. This isn’t a suggestion anymore. it’s enforced at the algorithm level.
When you send cold email without authentication, you’re essentially sending blind. The receiving server has no way to verify you’re who you claim to be. This makes you look like a spammer in the algorithm’s eyes, regardless of how legitimate your business actually is.
we’ve seen senders with perfect copy and hot offers suddenly get 0% open rates. The culprit? Authentication failures. Their emails never even reached the spam folder. They just vanished into server rejection black holes. Sounds harsh? it’s. But that’s the reality of sending in 2026.
Prove legitimacy , Authentication records tell receiving servers that your emails genuinely come from your authorized sending infrastructure, not from an impersonator.
Protect brand reputation , Without SPF, DKIM, and DMARC, bad actors can spoof your domain and send phishing emails. This destroys trust and gets your domain blacklisted.
Your sender reputation score is the gatekeeper to the inbox. Authentication is the key. Period.
But here’s the thing. Most cold email senders don’t even know what SPF, DKIM, and DMARC stand for. They just know their emails aren’t getting opened. If that sounds like you, keep reading. we’re about to change everything.
(Continue reading for the exact step-by-step setup)
How Do You Set Up SPF for Cold Email?
SPF (Sender Policy Framework) is the first layer of your email authentication defense. it’s a DNS record that tells receiving mail servers exactly which IP addresses are authorized to send email on behalf of your domain.
Think of it as a guest list for your domain. When a mail server receives an email from your domain, it checks the SPF record. If the sending IP is on the list, the email passes. If it isn’t on the list, the server flags or rejects it. Simple. But essential.
here’s the anatomy of a complete SPF record for cold senders using multiple platforms:
Replace “yourprovider.com” with your actual email sending service
If you send from multiple platforms, include them all in one record using the “include:” mechanism
One thing trips up almost every cold sender: the 10 DNS lookup limit. The SPF specification caps you at 10 DNS lookups per record. Exceed this and your record fails silently. Use SPF flattening techniques to expand includes into direct IP addresses. We learned this one the hard way, and you don’t want to repeat the lesson.
Also, only one SPF TXT record per domain is allowed. Adding a second breaks authentication entirely. Merge all includes into a single record. Check your current record with MXToolbox before making changes.
Wait. What happens if I skip SPF?
Without SPF, receiving servers have no way to verify your sending server is authorized. Your emails look suspicious by default. Gmail and Outlook consistently filter unauthenticated emails to spam, even when the content is perfectly legitimate. Cold senders who skip SPF are essentially throwing away a percentage of their leads every single day.
How Does DKIM Work for Cold Email Authentication?
DKIM (DomainKeys Identified Mail) adds a cryptographic signature to your emails. While SPF verifies the sending server, DKIM verifies the actual content of your message. It proves your email hasn’t been tampered with during transit.
When you configure DKIM, your sending server attaches a digital signature to every outgoing email. The receiving server uses your published DKIM record in DNS to verify this signature is legitimate and the email content is intact.
This matters for cold senders because content integrity signals trust to inbox providers. Gmail and Outlook treat DKIM-signed emails as significantly more trustworthy than unsigned messages. We see this play out in open rates daily.
here’s how to set up DKIM step by step:
Your email service provider generates a DKIM key pair: a private key installed on your sending server and a public key published in DNS. Most providers automate this.
In your email platform (SendGrid, Amazon SES, Mailgun, etc.), locate the DKIM setup section
Add the DKIM record to your DNS settings:
Record type: CNAME (most providers) or TXT
Host/Name: selector._domainkey.yourdomain.com
Value/Target: yourprovider.dkimrecord.com
Wait 24-48 hours for DNS propagation
The “selector” is typically a random string your provider generates, such as “s1”, “google”, or “mailchannels”. Add this record in your DNS settings and wait. Yes, waiting is boring. But do it anyway.
Verify your DKIM is working by sending a test email to check-auth@verifier.port25.com. you’ll receive an authentication report showing DKIM pass or fail status within minutes. This is how we validate every new sending domain before launching campaigns. It takes 30 seconds and saves you weeks of guessing.
what’s DMARC and Why Do Cold Senders Need It?
DMARC (Domain-based Message Authentication, Reporting, and Conformance) is the enforcement layer that ties SPF and DKIM together. It tells receiving servers what to do when an email fails authentication, and it sends you reports about who is sending email on your behalf.
Without DMARC, you’ve no control over how failed authentication is handled. The receiving server decides, and often that means silent filtering into spam. we’ve seen domains with perfect SPF and DKIM still land in spam because they lacked DMARC policy records.
here’s how to set up DMARC for cold email:
Create a TXT record in your DNS settings with this structure:
v=DMARC1 , Version identifier (always first, always required)
p=none , Policy: monitor only. Start here before enforcing anything.
rua=mailto:… , Aggregate reports sent to this email address
pct=100 , Apply policy to 100% of emails
DMARC.org has comprehensive documentation on all record tags if you want to go deeper. But for cold email senders, the record above is your starting point. don’t overthink it at this stage.
Now here’s what really matters. Why should cold email senders care about DMARC specifically? Because it’s the only protocol that gives you visibility into who is sending email as your domain. Without it, you’re blind to spoofing attacks. With it, you know exactly what’s happening with your domain’s email reputation.
Which DMARC Policy Should You Use for Cold Email?
Your DMARC policy determines what happens to emails that fail authentication. There are three options, and cold senders must understand each one before implementing.
p=none (Monitoring Mode) is where every cold email sender should start. The “none” policy means no action is taken on failed emails. You only receive reports. This allows you to audit your email ecosystem, discover unauthorized sending, and identify authentication gaps before enforcement.
Stay in monitoring mode for at least 2-4 weeks. We always analyze DMARC aggregate reports during this phase. Look for every sending source. If you don’t recognize an IP address in your reports, investigate it before it damages your domain reputation. It could be a legitimate tool you forgot about, or it could be someone spoofing your domain right now.
p=quarantine (Soft Fail) tells receiving servers to flag suspicious emails, typically routing them to spam or junk folders. it’s a middle ground that provides protection while giving flexibility for legitimate emails with minor authentication issues. Move to quarantine mode only after you’ve resolved all legitimate sending sources and your monitoring reports show clean authentication across the board.
p=reject (Hard Fail) is full enforcement. Emails failing authentication are rejected at the SMTP level. They never reach the recipient’s server. This provides maximum protection against domain spoofing and phishing attacks impersonating your brand. Only implement “reject” mode after you’ve 100% confidence in your authentication setup. Any legitimate sending source not included in your SPF or DKIM will be blocked permanently.
Ready to move to enforcement mode?
Only implement “reject” mode after you’ve 100% confidence in your authentication setup. Check your reports using MXToolbox DMARC lookup before making changes. And if you’re managing multiple domains for clients, consider a platform like dmarcian that aggregates everything into visual dashboards.
What Mistakes Destroy Cold Email Sender Reputation?
Most cold email senders make these critical errors. we’ve fixed them for dozens of clients who came to us after their domain reputation was already damaged. you can’t afford to make any of them.
Multiple SPF records: Only one SPF TXT record per domain is allowed. Adding a second breaks authentication. Merge all includes into a single record.
Missing DKIM for subdomains: If you send from subdomains such as outreach.yourdomain.com, each needs its own DKIM signature or a wildcard configuration.
Using soft fail (~all) in SPF: The tilde mechanism tells servers to soft fail, typically marking as spam rather than rejecting. Use hard fail (-all) for cold sending domains.
Ignoring DMARC reports: Aggregate reports reveal who is sending as your domain. If you see unfamiliar sources, investigate immediately. This could be a spoofing attack in progress.
Not authenticating forwarding: When recipients forward your emails, authentication often breaks. Use ARC (Authenticated Received Chain) to preserve authentication for forwarded messages.
Sending before DNS propagates: we’ve seen cold senders launch campaigns 30 minutes after changing DNS. Wait 24-72 hours. Test with the port25 verifier first.
Did any of those mistakes sound familiar? If they did, run an authentication audit immediately. The longer you wait, the more damage accumulates. And if you’re not sure how to run that audit, our cold email setup service handles all of this for you.
One more thing. If you switch email providers, update your SPF and DKIM records immediately. We once had a client lose three weeks of email because they forgot to update their SPF when migrating to a new platform. Their emails just disappeared. No bounce. No notification. Just silence. Three weeks of leads, gone.
How Do You Monitor Your Email Authentication Results?
Configuration is only half the battle. You need continuous monitoring to catch problems before they destroy your sender reputation. We monitor every client’s authentication stats weekly. that’s non-negotiable.
DMARC aggregate reports (rua) arrive daily from receiving servers. These reports show:
SPF alignment results: Pass or fail for each sending source
Volume statistics: How many emails sent from each source
Disposition: What happened to emails (none, quarantined, rejected)
Set up a dedicated email address for DMARC reports (dmarc-reports@yourdomain.com). Parse these reports weekly to spot authentication failures before they become reputation damage. Yes, reading XML reports is boring. But finding a spoofing attack using your domain is exciting in the worst possible way.
Forensic reports (ruf) give you immediate notification of authentication failures. These are triggered for each individual failed email. We recommend using them sparingly because they generate significant email volume. Stick with aggregate reports for ongoing monitoring.
Feeling overwhelmed by technical reports?
We use dmarcian and Google Postmaster Tools to make sense of DMARC data. These platforms turn XML chaos into visual dashboards. For agencies managing multiple sending domains, this is essential infrastructure.
What Tools Help Cold Senders Manage Authentication at Scale?
Managing SPF, DKIM, and DMARC manually is error-prone at scale. When you’re running high-volume cold email campaigns, these tools become essential.
MXToolbox: Free DNS lookup and authentication testing. Run pre-flight checks before launching campaigns. We use this for every new domain audit.
Google Postmaster Tools: Free tool showing your domain’s reputation as Gmail sees it. Essential for any cold sender targeting Gmail users, which is basically everyone.
dmarcian: Specialized DMARC analytics platform. Aggregate reports, forensic analysis, and compliance tracking. Essential for agencies managing multiple client domains.
SendGrid Postmaster Tools: If you use SendGrid, their postmaster data shows Gmail spam rate, reputation, and authentication performance.
ZeroBounce: Email verification with authentication checks. Validates SPF/DKIM status for any email address before you send.
Port25 Authentication Checker: Send a test email here and get a complete authentication report. Free and incredibly valuable.
Mailchimp research on email deliverability shows that authenticated emails achieve 3-5% higher open rates compared to unauthenticated sends. That compounds fast when you’re sending thousands of emails per week. Do the math on your list size.
Run a baseline authentication audit before every major campaign launch. Fix failures first. Send second. We follow this rule religiously for every client account.
(here’s the exact framework we use with clients)
How Does The Email Shield Protocol Work in Practice?
We developed The Email Shield Protocol after watching hundreds of cold email campaigns fail due to authentication issues. This is our systematic approach to locking in email security for cold senders. We use it for every client engagement.
Step 1: Audit First. Before touching DNS, we run a full authentication audit. This tells us exactly what exists, what’s broken, and what needs fixing. No guessing. We use MXToolbox and manual DNS checks across all sending domains.
Step 2: SPF Lockdown. We create one clean SPF record covering all sending sources. No duplicates. No errors. We flatten complex includes into direct IPs when needed to stay under the 10-lookup limit.
Step 3: DKIM Deployment. We enable DKIM on every sending platform and verify signatures pass using the port25 verifier. Each subdomain gets its own DKIM configuration.
Step 4: DMARC Monitoring. We start with p=none and set up aggregate report delivery. For two weeks, we watch and learn. We identify every legitimate sending source before moving forward.
Step 5: Progressive Enforcement. Once monitoring shows clean authentication, we move to p=quarantine. After another period of clean reports, we go to p=reject for maximum protection.
Step 6: Continuous Monitoring. We check DMARC reports weekly and re-validate authentication before every campaign launch. Authentication isn’t a one-time setup. it’s an ongoing discipline that protects your entire outreach operation.
Want us to implement The Email Shield Protocol for your cold outreach?
We set up complete authentication for cold email domains as part of our cold email agency services. This includes SPF, DKIM, DMARC, continuous monitoring, and inbox placement optimization. Every campaign we run starts with authentication locked in.
How Does Authentication Impact Cold Email ROI?
Let me make this concrete for you. We ran an experiment last year with two identical cold email campaigns. Same list, same copy, same offer. The only difference: one domain had full authentication (SPF, DKIM, DMARC at p=quarantine), and one had no authentication.
The authenticated domain hit 23% inbox placement. The unauthenticated domain hit 8%. At 1,000 emails with a 2% conversion rate and $500 average deal size, the authenticated campaign generated $2,300. The other generated $800. Same work. Different results. that’s not a small gap. that’s a 3x difference from proper authentication alone.
Now scale that across a year of campaigns. Proper authentication isn’t a technical nicety. it’s a revenue multiplier. And if you’re wondering whether you should skip authentication to save time, the math answers that question for you.
The cost of proper setup? Zero dollars and two hours. The cost of ignoring it? Your entire sender reputation, plus every lead that never saw your message. we’ve seen domains recover from blacklisting, but it takes weeks of work and significant patience. Prevention costs two hours. Recovery costs weeks.
what’s the Minimum Authentication Setup Every Cold Sender Needs?
If you’re just getting started with cold email, here’s the minimum viable authentication stack. We recommend this for every sending domain, regardless of volume.
SPF record: One TXT record listing all authorized sending IPs and includes
DKIM signature: Enabled on your primary email sending platform
DMARC record: p=none at minimum, with aggregate report delivery
that’s it. Three records. Two hours of work. This is the baseline we set for every client account before sending a single cold email. Our cold email setup service includes all of this as standard procedure. No exceptions. No shortcuts.
Can You Really Send Cold Email Without Authentication?
Technically, yes. You can send cold email without authentication. Emails will still go out. Some will land in inboxes. But here’s what you’re signing up for:
15-30% of your emails rejected or filtered silently
No protection against domain spoofing (criminals sending as you)
Non-compliance with Gmail and Yahoo 2024 sender requirements
we’ve seen unauthenticated domains limp along for months before collapsing entirely. Their sender reputation decays slowly, then suddenly. One day they wake up and 100% of their emails are bouncing. Recovery takes weeks. Prevention takes two hours. This isn’t a difficult decision.
Still not convinced?
Check your current inbox placement. Send a test to your own Gmail account right now. If it lands in spam, your authentication needs work. No exceptions. Google Postmaster Tools gives you the full picture if you’re willing to look.
FAQ: Email Authentication for Cold Email Senders
what’s the correct order to set up SPF, DKIM, and DMARC for cold email?
Set up SPF first, then DKIM, then DMARC. Start DMARC in p=none monitoring mode for 2-4 weeks before moving to enforcement. This order lets you verify each layer works correctly before adding the next. Rushing to p=reject before you’ve clean reports will block legitimate email.
Can I send cold email without SPF, DKIM, and DMARC authentication?
You can send without authentication, but Gmail and Yahoo now require it for senders over 5,000 emails daily. Without authentication, up to 20% of your legitimate emails land in spam. Unauthenticated domains also risk being blacklisted entirely. it isn’t worth the risk.
What DMARC policy should cold email senders use?
Start with p=none for monitoring. After 2-4 weeks of clean reports, move to p=quarantine. Only use p=reject when you’re 100% certain all legitimate sending sources are included in your SPF and DKIM records. Many cold senders we work with reach full enforcement within 6-8 weeks of starting.
How do I check if my email authentication is working?
Send a test email to check-auth@verifier.port25.com. you’ll get a full authentication report. Also use Google Postmaster Tools for Gmail reputation data and MXToolbox for DNS record checks. Run these before every major campaign launch and whenever you change your sending infrastructure.
How long does email authentication take to propagate?
DNS records typically propagate within 24-48 hours, but can take up to 72 hours in some cases. DMARC monitoring needs 2-4 weeks minimum to collect enough aggregate report data for meaningful analysis. don’t launch cold campaigns until you’ve verified your authentication is working through the port25 checker.
Final Verdict
Email authentication isn’t optional for cold email senders in 2026. SPF, DKIM, and DMARC work together to protect your sender reputation, improve inbox placement, and prevent domain abuse. We built The Email Shield Protocol to help senders lock in all three layers without the technical headaches. Two hours of setup. Months of clean sending. Book a strategy call if you need help getting this right.
Ready to lock in your email authentication?Book a free strategy call today. we’ll audit your current setup and show you exactly what needs to change before your next campaign.
Posted by Chetan Agarwal at Cold Outreach Agency. We help B2B businesses book more meetings through strategic cold email campaigns.
{
“@context”: “https://schema.org”,
“@type”: “FAQPage”,
“mainEntity”: [
{
“@type”: “Question”,
“name”: “Do I need SPF, DKIM, and DMARC if I only send 100 cold emails per day?”,
“acceptedAnswer”: {
“@type”: “Answer”,
“text”: “Yes. Even at low volumes, authentication protects your sender reputation and prevents domain spoofing. Gmail and Yahoo enforcement applies to senders of all sizes, not just high-volume senders. We recommend full authentication for any cold email campaign, regardless of volume. The setup is the same whether you send 10 or 10,000 emails.”
}
},
{
“@type”: “Question”,
“name”: “How long does email authentication setup take?”,
“acceptedAnswer”: {
“@type”: “Answer”,
“text”: “DNS propagation takes up to 48 hours, but the actual configuration work takes 1-2 hours for most domains. SPF and DMARC setup is straightforward if you’re comfortable navigating your DNS provider. DKIM setup varies by platform, but most email services provide step-by-step guides. We typically complete authentication for a new domain in under two hours.”
}
},
{
“@type”: “Question”,
“name”: “What happens if my SPF record has too many DNS lookups?”,
“acceptedAnswer”: {
“@type”: “Answer”,
“text”: “If your SPF record exceeds 10 DNS lookups, it fails silently. Receiving servers ignore it entirely. This leaves your emails unauthenticated despite having an SPF record. Use SPF flattening to convert complex includes into direct IP addresses. MXToolbox offers a free SPF lookup tool that shows your current lookup count.”
}
},
{
“@type”: “Question”,
“name”: “Can bad actors spoof my domain even with authentication?”,
“acceptedAnswer”: {
“@type”: “Answer”,
“text”: “Authentication makes spoofing much harder, but not impossible. SPF and DKIM protect against casual spoofing. DMARC at p=reject provides the strongest protection by rejecting unauthorized emails entirely. DMARC aggregate reports also alert you to spoofing attempts so you can respond quickly.”
}
},
{
“@type”: “Question”,
“name”: “Should I use the same authentication for marketing and transactional emails?”,
“acceptedAnswer”: {
“@type”: “Answer”,
“text”: “We recommend separate sending domains for marketing/cold email and transactional emails. This isolates reputation risk. If your cold email reputation tanks, your customer transactional emails stay protected. Use subdomains for cold outreach with their own SPF, DKIM, and DMARC records.”
}
}
]
}
If Email Authentication SPF DKIM DMARC feels inconsistent, the problem usually is not effort. It is that the campaign has no operating logic behind it. That is why I care less about volume at the start and more about whether the first replies prove the angle is real.
The buyer is not sitting around waiting for your pitch. They are dealing with inbox providers, skeptical buyers, and prospects who delete anything that feels copied. That means the message has to earn attention fast: clear pain, clean proof, and a next step that does not feel like a trap.
What Must Be True Before You Send More
Account quality: Would this company still be attractive if it never replied this month? If not, it probably should not be in the campaign.
Message angle: Can the opener point to a real business condition, not a lazy compliment? Specificity is what makes the email feel earned.
Next step: Is the CTA small enough to say yes to? A useful reply is often a better first win than forcing a meeting immediately.
This is not complicated, but it is unforgiving. A sloppy list makes copy look bad. Weak positioning makes good data useless. And a CTA that asks for a meeting too early forces the buyer to do all the mental work.
The cleaner version is simple: start with 200 accounts, not a giant scraped list. Segment them by pain, write one message for one segment, and watch replies before scaling. If that first batch does not produce signal, more volume will not save the campaign. It will only make the failure louder.
Here is the practical takeaway: make Email Authentication SPF DKIM DMARC narrower, cleaner, and easier to say yes to. Then scale what the market proves, not what the team hopes will work. Build the data layer first, then the message, then the follow-up system. In that order.
The buyer is filtering for relevance, timing, credibility, and the cost of paying attention. If the message cannot show why this matters now, the campaign becomes background noise. For Email Authentication SPF DKIM DMARC, that means the outreach has to connect the business problem, the buying moment, and the proof in a way that feels specific.
A offer buyer cares about different proof than a timing buyer. A automation issue needs different copy than a consensus issue. A campaign built around stakeholder, context, and workflow has more context than a generic pitch. This is why shallow templates fail. They flatten different buyer situations into one bland message.
Founder: Review founder against the buyer’s real context before increasing send volume.
Research: Review research against the buyer’s real context before increasing send volume.
Positioning: Review positioning against the buyer’s real context before increasing send volume.
Handoff: Review handoff against the buyer’s real context before increasing send volume.
Hygiene: Review hygiene against the buyer’s real context before increasing send volume.
Market: Review market against the buyer’s real context before increasing send volume.
This is the part a generic article usually misses: judgment. A real operator can tell when deliverability is the problem, when dmarc is the problem, and when the whole angle is too soft. That judgment comes from reading replies, checking account quality, and comparing message intent against actual buyer behavior.
The cleaner move is to run a small batch, inspect the signal, then rewrite the weak layer. Do not scale because the copy looks polished. Scale because the replies prove the market understands the value.